Knowing how to cook chickpeas from dried is one of those small kitchen skills that quietly pays off for years. The method is simple: soak the dried beans overnight, then simmer them until creamy, about an hour and a half to two hours on the stove, or pressure cook them in a fraction of that time. Cooked from scratch they taste nuttier and hold a better texture than anything from a can, they cost a fraction as much, and you get a pot of aquafaba, the cooking liquid, as a bonus ingredient. Canned chickpeas still have their place for speed, and this guide covers when to reach for each.
Below you will find every method with real timings, the baking-soda trick that guarantees creamy results, how to tell when they are done, how to fix a pot that refuses to soften, and the best ways to use and store the batch. Chickpeas are forgiving once you understand them, and a single pot can carry a week of hummus, salads, soups, and crispy snacks.
Dried vs. Canned Chickpeas: Which to Use
Both belong in a well-run kitchen, and the right choice depends on what you are making and how much time you have. Dried chickpeas are dramatically cheaper, let you control the final texture exactly, and reward you with aquafaba you can whip into meringues or use as an egg replacer. They do require planning, since most of the time is hands-off soaking and simmering. Canned chickpeas are already cooked, so they are the fastest route to dinner, drain, rinse for a minute to wash off excess sodium, and they are ready. As a rough conversion, two fifteen-ounce cans equal about three cups of cooked chickpeas, or roughly one cup of dried beans before cooking.
My honest rule of thumb: cook dried chickpeas when texture matters or you are batch cooking, hummus, salads, and anything where you want them whole and creamy rather than mushy, and keep a couple of cans in the pantry for the nights you forgot to soak. Doing both gives you the savings of dried with the convenience of canned as a backstop.
How to Soak Dried Chickpeas
Chickpeas are firmer than most beans and genuinely benefit from soaking, which cuts the cooking time, helps them cook evenly, and makes them easier to digest. There are two ways to do it.
Overnight soak (best)
Put the dried chickpeas in a large bowl, cover them with several inches of water, they will roughly double in size and drink a lot, and leave them on the counter for eight to twelve hours or overnight. Drain and rinse before cooking. Adding a teaspoon of salt to the soaking water seasons them from the inside and, contrary to old kitchen lore, does not toughen the skins; if anything it helps them cook up tender.
Quick soak (in a hurry)
If you forgot to plan ahead, cover the chickpeas with water in a pot, bring to a boil for two minutes, then turn off the heat, cover, and let them sit for one hour. Drain, rinse, and cook as usual. It is not quite as good as a long soak, but it works.
You can skip soaking entirely and cook dried chickpeas straight from the bag, but expect a much longer cooking time and slightly less even results. Soaking is twenty seconds of effort the night before for a noticeably better pot.
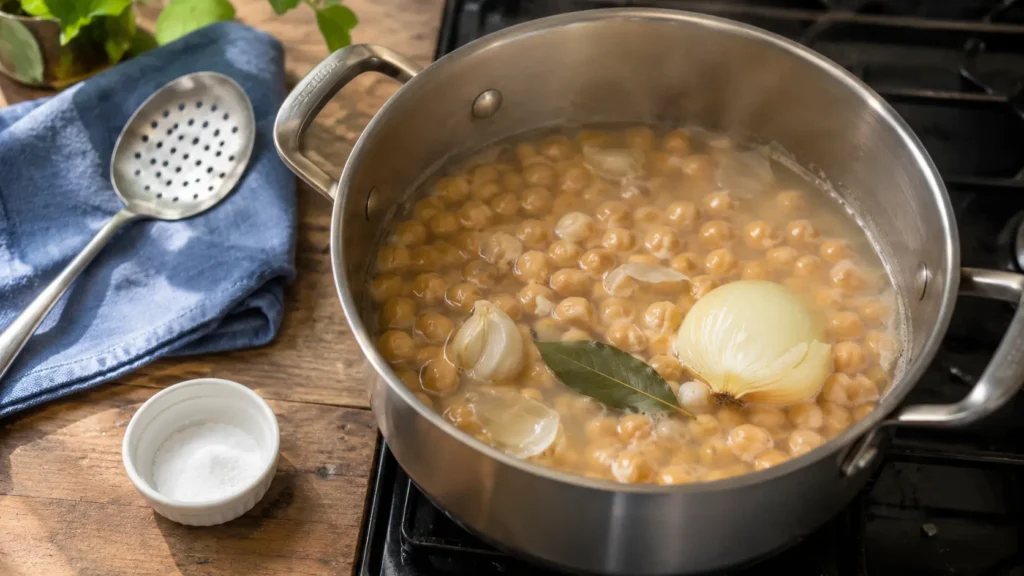
How to Cook Chickpeas on the Stovetop
The stovetop gives you the most control and the most flavor, because you can add aromatics and watch the texture closely.
- Drain the soaked chickpeas and add them to a large pot. Cover with two to three inches of fresh water.
- Drop in aromatics if you like, a halved onion, a few garlic cloves, a bay leaf, and a half teaspoon of baking soda, which is the secret to creamy chickpeas (more on that below).
- Bring to a boil, then reduce to a gentle simmer. Skim off any foam that rises in the first few minutes.
- Simmer partially covered for ninety minutes to two hours. Start checking at sixty minutes, then every fifteen minutes after.
- Add salt in the last fifteen minutes, then drain, but save that cooking liquid.
Fresh-ish dried beans cook faster; old beans that have sat in the pantry for a year or two can take well over two hours, which is the single most common reason a pot seems to never soften. A gentle simmer rather than a hard boil keeps the chickpeas intact instead of blowing them apart.
How to Cook Chickpeas in the Instant Pot
A pressure cooker is the fastest hands-off method and my default for batch cooking. Use the cooking liquid at a roughly three-to-one ratio over the beans, since almost none evaporates.
- Soaked chickpeas: high pressure for ten to fifteen minutes, ten for a firm bean with a little bite, fifteen for buttery soft, then let the pressure release naturally for about twenty minutes.
- Unsoaked chickpeas: high pressure for forty to forty-five minutes, again with a twenty-minute natural release.
A natural release matters here: letting the pressure come down on its own keeps the skins from bursting and finishes the cooking gently. If they come out a touch firm for your needs, you can always simmer them a few extra minutes or run another short pressure cycle.
The Baking Soda Trick for Creamy Chickpeas
If you want truly creamy chickpeas, the kind that make silky hummus, add a half teaspoon of baking soda to the cooking water. The slightly alkaline environment breaks down the pectin in the skins and helps the beans soften faster and more completely. It is the difference between grainy, gritty hummus and the glossy, smooth kind. For the smoothest possible result, you can also rub the cooled cooked chickpeas gently in a clean towel and skim off the loose skins before blending; it is a few extra minutes that genuinely transforms the texture. A scoop of this batch is all you need for a bowl of creamy garlic hummus.
How to Tell When Chickpeas Are Done
As with any dried bean, doneness is about texture, not the clock. A properly cooked chickpea is tender all the way through with no chalky center, and it should squash easily between two fingers or against the roof of your mouth. For salads and stews where you want them to hold their shape, pull them at the firmer end. For hummus or anything blended, cook them until they are very soft and almost falling apart. Taste a few rather than trusting the timer, since age, variety, and even your local water all change how long a batch takes.
Troubleshooting: Why Won’t My Chickpeas Soften?
Few things are as frustrating as a pot of chickpeas that stay stubbornly hard. There are usually three culprits, and all are fixable.
- Old beans. Dried chickpeas that have been in the cupboard for a year or more can take twice as long and sometimes never fully soften. Buy from a shop with good turnover and store them airtight.
- Hard water or acid. Very hard water slows softening, and acidic ingredients like tomatoes, lemon, or vinegar firm up the skins. Add anything acidic only after the beans are already tender. A pinch of baking soda counteracts hard water.
- Not enough time. Chickpeas simply take longer than most beans. Keep simmering and add hot water as needed; they will get there.
Don’t Throw Out the Aquafaba
The cloudy liquid left behind, whether from your pot or from a can, is aquafaba, and it is one of the most useful ingredients in vegan cooking. Whipped, it forms stiff peaks like egg whites and stands in for them in meringues, mousses, and mayonnaise; a few tablespoons also work as a binder in baking. Strain and refrigerate it for up to a week, or freeze it in an ice-cube tray for longer. Getting two ingredients from one pot is part of why cooking chickpeas from dried feels so satisfying.
Ways to Use Your Batch of Chickpeas
A pot of cooked chickpeas is a week of meals waiting to happen. Blend them into hummus or a creamy dip. Toss them with vinaigrette, herbs, cucumber, and tomato for a fast, protein-rich salad that holds for days. Simmer them into curries, stews, and soups, where they add body and stay intact; a deep bench of bean soups is a natural home for them. Roast drained, dried chickpeas with oil and spices at 400°F until crunchy for a snack that rivals a tray of root vegetable fries, and brighten any chickpea bowl with a side of quick-pickled dilly carrots. Because they are naturally gluten-free, chickpeas also slot neatly into a rotation of gluten-free dinners.
Nutrition: Why Chickpeas Are Worth It
Chickpeas are a nutritional workhorse. A cooked cup provides around fifteen grams of protein and twelve to thirteen grams of fiber, along with iron, folate, manganese, and a slow-burning carbohydrate that keeps you full for hours. That protein-and-fiber combination is part of why legume-rich eating patterns are consistently tied to better long-term health, a point well documented by NutritionFacts.org and Forks Over Knives. To get more from their plant-based iron, pair chickpeas with a source of vitamin C, a squeeze of lemon over hummus or diced peppers in a chickpea salad does the job. For reliable techniques on pressure cooking and roasting them, Minimalist Baker is a dependable reference.
How to Store Cooked Chickpeas
Chickpeas are made for batch cooking because they keep so well. Let them cool for ten or fifteen minutes before sealing the container so trapped steam does not shorten their life, then refrigerate them in their cooking liquid, which keeps them from drying out, for up to four or five days. They also freeze beautifully: drain, spread them on a tray to freeze individually so they do not clump, then bag them for up to three months. Thaw in the fridge or drop them straight into a simmering soup. Cook a double batch on the weekend and you have the foundation for hummus, salads, and snacks ready whenever you are.
How to Make Crispy Roasted Chickpeas
Roasted chickpeas deserve their own moment, because they turn a humble bean into an addictive, crunchy snack. The trick to getting them genuinely crisp rather than chewy is the same one that works for tofu: get the water out. Drain and rinse your cooked or canned chickpeas, then dry them thoroughly with a towel, rolling them around until the loose skins flake off, those skins are what trap moisture and prevent crisping. Toss the dry chickpeas with a little oil and salt, spread them in a single layer on a sheet pan, and roast at 400°F for twenty-five to thirty-five minutes, shaking the pan once or twice, until they are golden and rattle when you shake them.
Season them only after roasting if you are using spices that scorch, like garlic powder or smoked paprika, or toss them in the spice mix in the last few minutes. Eat them warm for maximum crunch, since they soften as they cool and sit. They are excellent on salads and grain bowls for texture, scattered over soup like croutons, or eaten by the handful straight off the pan. A batch keeps its crunch best for a day, so roast them close to when you want them.
A Note on Digestion
Chickpeas, like all legumes, contain fiber and certain complex sugars called oligosaccharides that some people find produce gas, especially when beans are new to their diet. This is normal and tends to ease as your gut adjusts over a few weeks of regular eating. A few habits make a real difference in the meantime: always discard the soaking water and cook in fresh water, cook the beans until they are fully tender rather than firm, and introduce them gradually rather than in a huge portion all at once. Rinsing canned chickpeas well helps too. Cooking them with a piece of kombu seaweed is a traditional trick some cooks swear by. None of this is a reason to avoid one of the most nourishing foods you can eat, it is simply a matter of easing in, and most people find their digestion adapts quickly.
Frequently Asked Questions
Do you have to soak chickpeas before cooking?
Soaking is strongly recommended because it shortens the cooking time, helps them cook evenly, and makes them easier to digest. You can cook them unsoaked, but it takes much longer, about forty to forty-five minutes in a pressure cooker or several hours on the stove.
How long does it take to cook chickpeas?
Soaked chickpeas take about ninety minutes to two hours on the stovetop, or ten to fifteen minutes at high pressure in an Instant Pot with a natural release. Unsoaked chickpeas need forty to forty-five minutes under pressure. Always judge by texture, since old beans cook more slowly.
Why are my chickpeas still hard after cooking?
Usually the beans are old, the water is very hard, or an acidic ingredient was added too early. Keep simmering with a pinch of baking soda, add acidic ingredients only after they are tender, and replace beans that have been in the pantry for over a year.
How many cans of chickpeas equal a cup of dried?
About one cup of dried chickpeas yields roughly three cups cooked, which is the equivalent of two fifteen-ounce cans. Keep that ratio in mind when converting a recipe between dried and canned.
Should you add salt when cooking chickpeas?
Yes. Salting the soaking water and adding salt in the last fifteen minutes of cooking seasons the beans from the inside and, despite the old myth, does not make them tough. Hold acidic ingredients like lemon and tomato until the chickpeas are already tender.
Can you freeze cooked chickpeas?
Yes. Cooked chickpeas freeze very well for up to three months. Drain them, freeze them spread out on a tray so they stay loose, then transfer to a bag. Thaw in the fridge or add them straight to a simmering dish.
Bottom Line
Cooking chickpeas from dried is mostly hands-off patience rewarded with better flavor, better texture, and real savings. Soak them overnight, simmer gently for ninety minutes to two hours or pressure cook them in fifteen, add a pinch of baking soda for creaminess, and salt them as they finish. Keep the aquafaba, store the batch in its liquid or the freezer, and you have one of the most versatile, nourishing ingredients in the kitchen ready for hummus, salads, soups, and crispy snacks all week. Canned chickpeas will always be there for a rushed night, but once you taste a pot you cooked yourself from scratch, you will understand exactly why it is worth the wait. Keep a bag of dried chickpeas and a can or two in the pantry, and you will always have the makings of a good, cheap, plant-powered meal within reach.