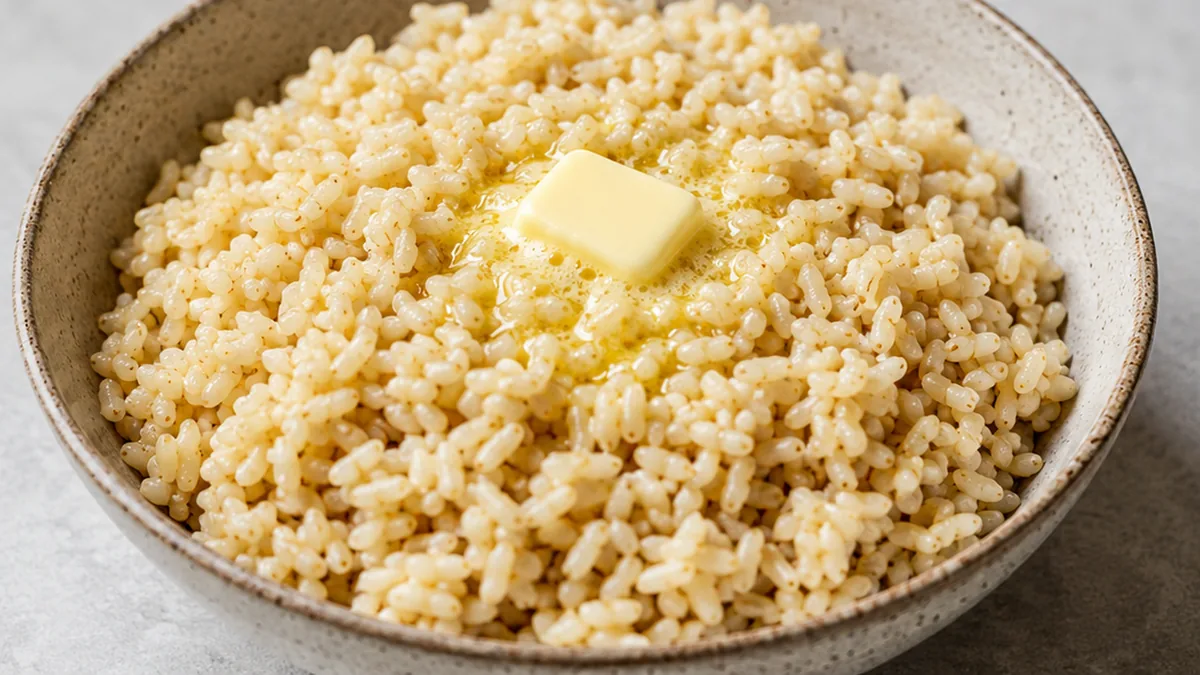
Instant pot brown rice is a reliable way to cook perfect grains. This method ensures fluffy, tender results every time, eliminating common cooking frustrations.
Key takeaways
- Use a 1:1 ratio of brown rice to water for optimal results.
- Always use the Natural Pressure Release (NPR) method for at least 10-15 minutes.
- Ensure your Instant Pot inner pot is clean to prevent ‘burn’ notices.
- Stir the rice gently after cooking to separate the grains.
Perfect Instant Pot Brown Rice
Ingredients
Method
- Rinse the brown rice in a fine-mesh strainer under running water until the water runs clear.
- Add rinsed rice and 2 cups of water to the Instant Pot. Close and lock the lid. Select the “Pressure Cook” or “Manual” button and set the cooking time to 20 minutes on high pressure.
- Once pressure cooking is complete, allow the Instant Pot to naturally release pressure for 5 minutes (the ‘Keep Warm’ timer will count up).
- After 5 minutes, press “Cancel” and carefully move the steam release valve to the “Venting” position to quick release any remaining pressure. Open the lid and fluff the brown rice with a fork.
- Serve the brown rice as is, or stir in butter, ghee, oil, or your preferred seasonings.
Notes
– Natural release is crucial: Allowing the Instant Pot to naturally release pressure for 3-5 minutes before quick releasing helps the grains fully absorb moisture and become tender without drying out.
– Storage: Cooked brown rice can be stored in an airtight container in the refrigerator for up to 4-5 days. It also freezes well for up to 3 months; thaw overnight in the fridge and reheat gently. Nutrition information is an estimate, calculated automatically. Values vary with brands, substitutions and portion sizes.
The Science Behind Perfectly Cooked Instant Pot Brown Rice
The Instant Pot excels at cooking brown rice due to its ability to maintain a consistent, high-pressure environment. This pressure raises the boiling point of water, allowing it to reach temperatures higher than standard stovetop boiling. This superheated steam penetrates the tough bran layer of the brown rice more efficiently, leading to faster and more even cooking. The key to success lies in the precise water-to-rice ratio and the natural pressure release (NPR) method. The NPR allows the steam to gradually dissipate, rehydrating the rice grains and preventing them from becoming mushy or hard. Unlike stovetop methods where heat can fluctuate, the Instant Pot provides a controlled cooking environment, minimizing the risk of scorching or unevenly cooked grains. The initial high-pressure cooking phase gelatinizes the starches within the rice, while the subsequent natural release phase allows the moisture to redistribute evenly, resulting in fluffy, tender grains.
Troubleshooting
- Rice is too hard or undercooked: This usually means not enough liquid was used, or the pressure release was too quick (e.g., Quick Release instead of Natural Release). Ensure you use the recommended 1:1 ratio and always opt for Natural Pressure Release for at least 10-15 minutes.
- Rice is mushy or gummy: Too much liquid is the most common culprit. While the 1:1 ratio is standard, some rice varieties might absorb slightly less. If this happens, try reducing the water by a tablespoon or two next time. Also, avoid opening the lid immediately after cooking; allow for the NPR.
- Rice is stuck to the bottom: This can happen if the pot is not properly deglazed before adding rice, or if the rice is not stirred after cooking. A thin layer of butter, ghee, or oil at the bottom before adding rice can help prevent sticking. Stirring gently after the NPR also helps separate the grains.
- Burn notice: This often indicates insufficient liquid or food particles stuck to the bottom of the inner pot. Ensure the inner pot is clean and that the water-to-rice ratio is correct. Using a bit of oil or butter can also help create a barrier.
Substitutions
- Water: You can substitute half of the water with low-sodium vegetable broth or chicken broth for added flavor. The rice will absorb the broth, resulting in a richer taste, but the texture should remain similar.
- Butter/Ghee/Olive Oil: These are primarily for serving and add richness. They can be omitted entirely if you prefer plain rice or are serving with a sauce that provides moisture and fat.
- Seasonings: Salt is a common addition to the cooking water (about 1/2 teaspoon). You can also add herbs like a bay leaf or spices like garlic powder to the water for infused flavor. These will subtly alter the final taste.
- Brown Rice Variety: While this recipe is optimized for standard long-grain brown rice, short-grain or medium-grain brown rice can be used. Cooking times might vary slightly, and the texture may be a bit stickier for short-grain varieties.
Pro tips
- Don’t skip the rinse: Rinsing brown rice removes excess starch, preventing stickiness and ensuring each grain cooks separately. I’ve found that a good rinse is key to that ideal fluffy texture.
- Natural release is crucial: Allowing the Instant Pot to naturally release pressure for 3-5 minutes before quick releasing helps the grains fully absorb moisture and become tender without drying out.
- Storage: Cooked brown rice can be stored in an airtight container in the refrigerator for up to 4-5 days. It also freezes well for up to 3 months; thaw overnight in the fridge and reheat gently.
Master this simple Instant Pot brown rice recipe and enjoy perfectly cooked grains every time. It’s a versatile base for countless meals! Experiment with different seasonings to match your favorite cuisines.
Frequently asked questions
Why is my Instant Pot brown rice still hard?
This usually indicates insufficient liquid or an incomplete pressure cycle. Ensure you are using the recommended 1:1 rice-to-water ratio and that the Instant Pot completed its full pressure cooking time. Always allow for Natural Pressure Release (NPR) for at least 10-15 minutes.
How do I prevent my brown rice from being mushy in the Instant Pot?
Mushy rice typically results from too much liquid. Try slightly reducing the water in your next batch, perhaps by a tablespoon. Also, ensure you are not opening the lid too soon; the NPR phase is crucial for moisture redistribution.
Can I use broth instead of water for Instant Pot brown rice?
Yes, you can substitute water with low-sodium vegetable or chicken broth. This will add extra flavor to your rice. Keep the liquid ratio the same as you would with water. The rice will absorb the savory notes from the broth.
What is the best way to store leftover Instant Pot brown rice?
Allow the rice to cool completely before storing it in an airtight container in the refrigerator. Properly stored, it should last for 3-4 days. Reheat gently in the microwave or on the stovetop with a splash of water.
Try this next: Crispy Rice Perfection! Unlock Ultimate Flavor!
More from Vegan Air Fryer →