The quest for the perfect crispy Persian rice, known as Tahdig, is a dish many home cooks embark on. This recipe demystifies the process, delivering a gloriously golden, crunchy crust alongside fluffy, perfectly cooked rice, all elevated by a topping of spiced golden chickpeas. Whether you’re new to Persian cuisine or a seasoned pro, this guide breaks down the steps to achieve that coveted Tahdig texture. It’s more than just rice; it’s a celebration of texture and flavor, designed to impress at any meal.
Key takeaways
- The crispiness of Tahdig comes from a careful balance of fat, controlled heat, and steam.
- Properly parboiling and draining the rice is essential for texture.
- Don't skimp on the fat; it's key to preventing sticking and achieving a golden crust.
- Allowing the tahdig to rest before inverting helps the crispy layer set.
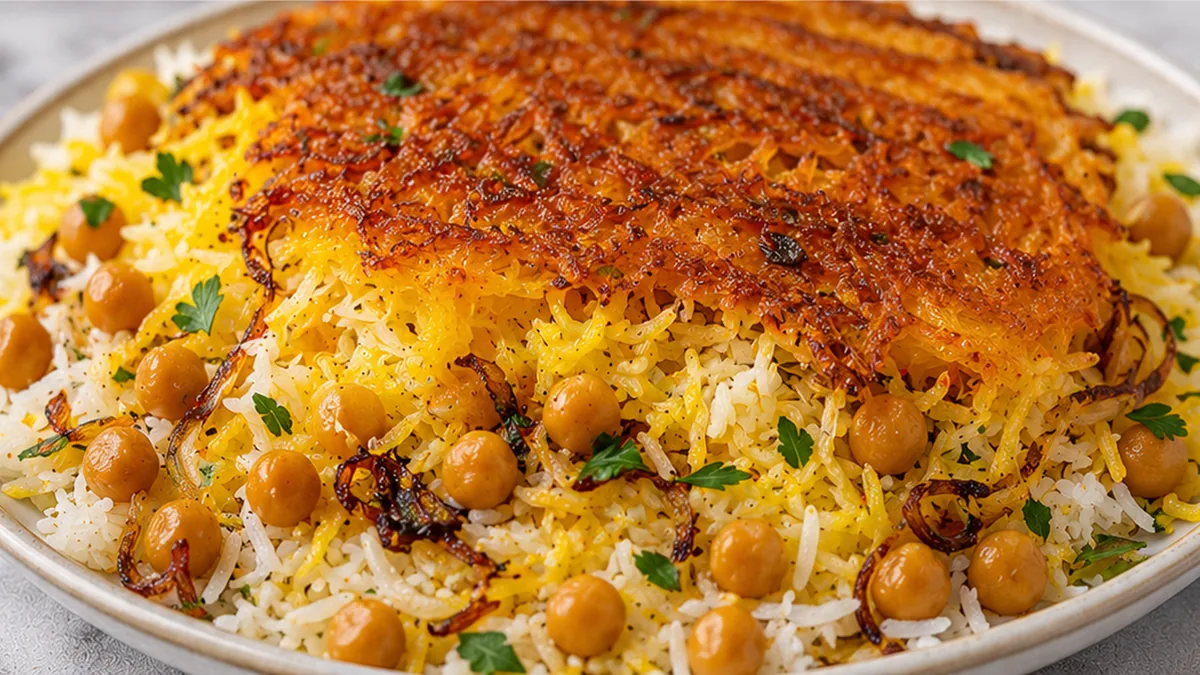
Crispy Persian Rice (Tahdig) with Golden Chickpeas
Ingredients
Method
- Bring 6 cups of water and about 1/4 cup kosher salt to a boil in a large pot. Rinse the basmati rice under water. Once the water is boiling, add the rice, and stir. Cook, stirring occasionally until al dente, about 6 to 8 minutes. Drain into a sieve and rinse with cold water to stop the cooking.
- In a bowl, combine 1 1/2 cups of the cooked rice with the plain yogurt. Mix well.
- Melt together the salted butter and 3 tablespoons extra virgin olive oil in a 10-inch skillet set over medium heat. When the butter melts, add the yogurt-coated rice and level it out with the back of your spoon. Pile the remaining plain basmati rice into the pan, mounding it toward the center.
- Using the handle of a wooden spoon, gently dig 5-6 holes into the rice down to the bottom of the skillet. Ensure there is enough oil in the pan so that you can see it bubbling up the sides. Add more olive oil if needed.
- Cook the rice over medium heat, turning the pan a quarter turn every 5 minutes to ensure even browning. Cook until you start to see a golden crust begin to form at the sides of the pan, about 15 minutes. Then reduce the heat to low and continue cooking another 15 to 20 minutes, until the crust is golden brown (35-40 minutes total).
- Meanwhile, prepare the chickpeas. Heat a large, high-sided skillet over medium heat. Add 1/4 cup extra virgin olive oil, drained chickpeas, garlic, shallots, turmeric, paprika, a pinch of red pepper flakes, and kosher salt. Cook, stirring occasionally until the chickpeas are crisped all over, about 8-10 minutes. Add fresh mint or cilantro, tossing to combine. Cook for 2 more minutes, until toasted, then remove from heat.
- Run a spatula along the edges of the pan to release the rice crust. Carefully invert the rice onto a large platter, revealing the golden tahdig. Serve topped with the spiced chickpeas, fresh herbs, and any extra garnishes.
Notes
– Don’t skimp on the salt in the boiling water; it seasons the rice perfectly.
– Ensure your skillet has even heat distribution to prevent burning.
– Listen for the gentle sizzle; it indicates the crust is forming correctly. Nutrition information is an estimate, calculated automatically. Values vary with brands, substitutions and portion sizes.
The technique that makes it
The trick to Persian rice, or Tahdig, lies in creating a distinct, crispy bottom layer while keeping the rice above fluffy and separate. This is achieved through a precise combination of fat, heat, and steam management. The basmati rice is parboiled, then coated with a mixture of yogurt and egg (though this recipe simplifies with just yogurt and butter/oil) which helps bind the grains and promotes browning. The crucial step involves layering this rice mixture into a non-stick pot with a generous amount of fat (butter and olive oil in this case) and then cooking it over medium-low heat. The fat prevents sticking and conducts heat evenly, creating the coveted crispy crust. A tight-fitting lid, often with a kitchen towel tucked under it, traps steam. This steam cooks the rice above the crust and also helps to gently steam the bottom layer, ensuring it doesn’t burn but rather crisps and browns. The initial high heat sears the bottom, while the subsequent lower heat and steam allow it to develop a golden, brittle texture without becoming oily or burnt. The chickpeas and aromatics are typically fried separately or layered within the rice to add flavor and texture to the crispy layer.
Troubleshooting
- Problem: Rice is mushy and not crispy.
Fix: Ensure the rice is properly drained after parboiling and not overcrowded in the pot. Use sufficient fat (butter/oil) to coat the bottom and sides. Maintain consistent medium-low heat; too high will burn, too low will steam rather than crisp. Ensure the lid is tightly sealed to trap steam effectively. - Problem: Tahdig is burnt and bitter.
Fix: Reduce the heat immediately. The initial searing might have been too aggressive. Ensure the rice is not packed too tightly, allowing for even heat distribution. A slightly thicker layer of rice can sometimes burn more easily than a thinner one. - Problem: Tahdig is sticking to the pot.
Fix: Insufficient fat is the most common culprit. Ensure a generous amount of butter and olive oil is used to coat the bottom and sides of the non-stick pan before adding the rice. Let the tahdig rest for at least 10-15 minutes after cooking before attempting to invert it; this allows the crust to firm up. - Problem: Rice is dry and hard.
Fix: The rice may not have received enough steam. Ensure the lid is tightly sealed and consider adding a tablespoon or two of water or broth to the bottom layer of rice before cooking if your rice tends to dry out.
Substitutions
- Yogurt: Plain Greek yogurt can be used for a thicker, tangier binder. Sour cream is another option, offering a similar richness and tang. The goal is to add moisture and help bind the rice grains for crisping.
- Butter: Ghee offers a nutty flavor and a higher smoke point, making it excellent for achieving a deep golden crust. A neutral oil like canola or vegetable oil can be used, but will result in a less rich flavor and potentially a slightly different crisp texture.
- Herbs (Mint/Cilantro): Parsley or dill can be substituted for a different fresh, herbaceous note. Dried herbs can be used sparingly if fresh are unavailable, but will impart a less bright, fresh flavor.
- Chickpeas: Lentils (like brown or green) can be used for a similar earthy texture. Small, diced potatoes or even thinly sliced onions, fried until golden, can also be layered in for added texture and flavor.
Pro tips
- Use aged basmati rice for the best fluffy texture.
- Don’t skimp on the salt in the boiling water; it seasons the rice perfectly.
- Ensure your skillet has even heat distribution to prevent burning.
- Listen for the gentle sizzle; it indicates the crust is forming correctly.
Achieve restaurant-quality Tahdig at home with this straightforward yet impressive recipe. Enjoy this crispy, golden delight as the star of your next meal.
Try this next: CRISPY Tandoori Chickpea Wraps – Your New Fave!
More from Vegan Bowls →
Frequently asked questions
How do I make tahdig crispy without burning it?
Achieve crispy tahdig by using medium-low heat and a heavy-bottomed, non-stick pan. Ensure the rice is well-packed. You can also add a thin layer of oil or butter to the bottom of the pan before adding the rice. Listen for a gentle sizzle, not a harsh crackle, indicating it’s browning perfectly.
Can I make tahdig ahead of time?
Yes, you can prepare the rice mixture for tahdig ahead of time. Cook the rice as instructed, then gently fold in the crispy elements. You can refrigerate the mixture for up to a day. When ready to serve, reheat it in a non-stick pan over medium-low heat to re-crisp.
What can I substitute for saffron in tahdig?
While saffron provides a distinct aroma and color, you can substitute it with a pinch of turmeric for color. For a different flavor profile, consider adding a bit of smoked paprika or a small amount of sumac to the rice before pressing it into the pan. These offer color and a unique taste.
How do I store leftover tahdig?
Store leftover tahdig in an airtight container at room temperature for up to a day, or refrigerate for up to three days. To reheat and regain crispiness, place it in a dry, non-stick skillet over medium-low heat. Cover for a few minutes to steam, then uncover to crisp up.