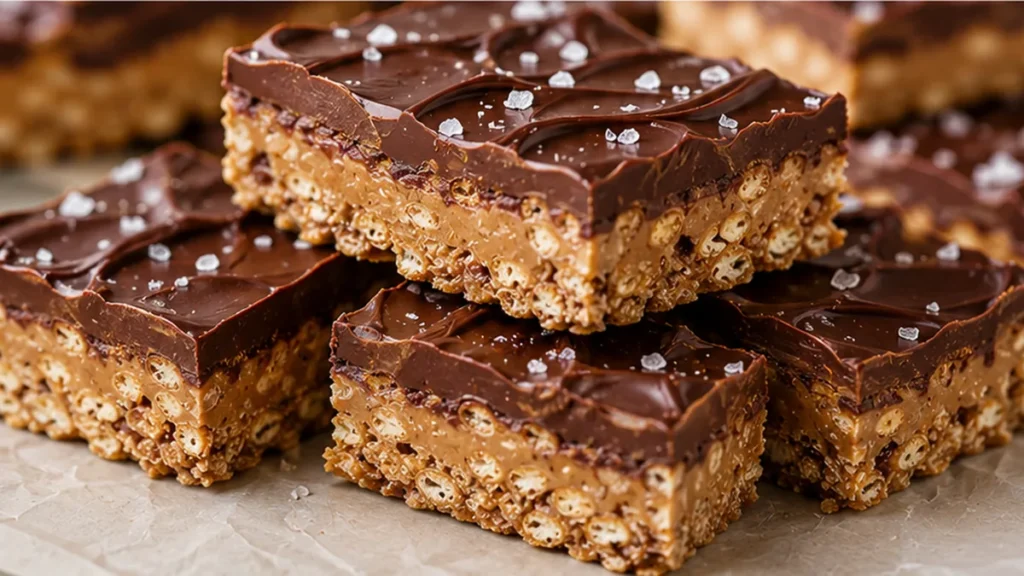
These chewy peanut butter bars are the ultimate treat for anyone who loves a perfect balance of sweet, salty, and chocolatey flavors. This recipe takes classic no-bake bars to a new level with layers of crispy brown rice krispies, a rich peanut butter filling, and a decadent chocolate topping. They are surprisingly easy to make, perfect for a quick dessert or a satisfying snack. these peanut butter bars are a guaranteed crowd-pleaser. The combination of textures and flavors makes them irresistible, and you’ll find yourself making them again and again.
Key takeaways
- The key to perfect peanut butter bars is gentle heating for the base binder and firm pressing.
- Ensure the chocolate topping has enough coconut oil to set properly.
- Proper pan lining is essential to prevent sticking.
- Adjust sweetener levels slightly if base texture is consistently too hard or soft.

Ultimate Chocolate Peanut Butter Bars!
Ingredients
Method
- Line a 9×13 inch baking dish with parchment paper.
- To make the chewy layer: Add the brown rice krispies to a large bowl.
- In a medium pot, combine the honey, maple syrup, peanut butter, and coconut oil. Bring to a gentle boil over medium heat, stirring constantly. Cook 2 minutes, then remove from the heat and pour the mix over the brown rice krispies. Stir well to combine. Spread the mix out onto the prepared pan, packing it in tightly. Place in the freezer.
- To make the peanut layer: In a medium pot, mix the peanut butter, maple syrup, and 1/4 cup coconut oil. Bring to a gentle boil over medium heat, stirring constantly. Cook 2 minutes, then remove from the heat. Stir in the vanilla and salt. Pour over the krispies layer. Freeze 30 minutes, until firm.
- Melt together the chocolate and 1 tablespoon coconut oil in the microwave. Let cool 5 minutes and then spread the chocolate over the peanut butter mix layer. Return to the fridge to set, about 10 minutes, then slice. The chocolate will not be totally set, but slicing is easier this way. Keep in the fridge.
Notes
– Ensure your honey and maple syrup are heated to a gentle boil for at least 2 minutes to help the bars set properly.
– For clean slices, warm your knife slightly under hot water before cutting the chilled bars. Allergens: Peanuts, Wheat, Soybeans. Nutrition information is an estimate, calculated automatically. Values vary with brands, substitutions and portion sizes.
The technique that makes it
The magic behind these Ultimate Chocolate Peanut Butter Bars lies in the precise balance of ingredients and a two-stage process that ensures both a chewy base and a perfectly set chocolate topping. The first stage involves creating the chewy peanut butter and brown rice krispies base. It’s crucial to melt the honey, maple syrup, and initial 1/4 cup of peanut butter with coconut oil over low heat. This gentle heating process allows the ingredients to emulsify properly, creating a cohesive mixture that will bind the cereal. Avoid high heat, which can scorch the sugars and alter the texture. Once combined, quickly fold in the brown rice krispies. The goal is to coat them evenly without overmixing, which can crush the cereal and lead to a dense, hard bar. Press this mixture firmly and evenly into the prepared pan. This step is vital for structural integrity; a loosely packed base will crumble easily. The second stage is the chocolate topping. Melting the remaining peanut butter with maple syrup and coconut oil creates a rich, smooth layer. The coconut oil is key here; it helps the chocolate set up with a slightly firmer, more snap-like texture than if only peanut butter and chocolate were used. Adding vanilla extract enhances the overall flavor profile. Pouring this warm, smooth topping over the pressed base and spreading it evenly is the final step before chilling. The contrast in textures – the chewy, slightly sticky base and the firm, rich chocolate topping – is what improves these bars.
Troubleshooting
- Problem: Bars are too hard and crumbly.
Fix: This usually happens if the cereal mixture was overcooked or if not enough binder (honey/syrup/peanut butter) was used. Ensure you melt the base ingredients gently and fold in the cereal quickly. For future batches, slightly increase the liquid sweeteners or peanut butter in the base. - Problem: Chocolate topping is greasy or won’t set.
Fix: Ensure the coconut oil in the topping is fully incorporated and the mixture is smooth. If it’s too oily, it might be due to the type of peanut butter used (natural ones can separate) or too much oil. Try using a processed peanut butter for a more stable topping, or slightly reduce the coconut oil in the topping mixture next time. Chilling thoroughly is also essential for setting. - Problem: Bars stick to the pan.
Fix: Proper pan preparation is key. Line your pan generously with parchment paper, ensuring there’s an overhang on the sides to easily lift the bars out. Greasing the pan lightly before lining can also help prevent sticking. - Problem: Base is too soft or gooey.
Fix: This can occur if the base mixture wasn’t heated sufficiently to allow the binders to thicken, or if too much liquid was added. Ensure the initial mixture is heated until smooth and slightly thickened before adding the cereal. Pressing the base firmly into the pan also helps compact it.
Substitutions
- For the honey/maple syrup in the base: You can substitute agave nectar or golden syrup. The texture might be slightly chewier or softer depending on the syrup used.
- For the creamy peanut butter: Almond butter or cashew butter can be used. This will alter the flavor profile significantly, making the bars taste more of the substitute nut butter. Ensure they are smooth and unsweetened for best results.
- For the brown rice krispies: Puffed quinoa or puffed wheat cereal can be used as a substitute. The texture and flavor will be different; puffed quinoa offers a nuttier taste and slightly different crispness.
- For the coconut oil in the topping: Unsalted butter can be used, but it will result in a topping that is softer at room temperature and may not set as firmly as when using coconut oil.
Pro tips
- Use only peanuts and salt in your peanut butter for the best flavor and texture.
- Ensure your honey and maple syrup are heated to a gentle boil for at least 2 minutes to help the bars set properly.
- For clean slices, warm your knife slightly under hot water before cutting the chilled bars.
Enjoy these delightful bars chilled for the best texture. They are a wonderful addition to any dessert spread or lunchbox.
Try this next: The ULTIMATE Chocolate Peanut Butter Crunch Bars!
More from Vegan Desserts →
Read also on TastyBend: Cake Pop Nutrition Facts: Complete Expert Guide to Smart Dessert Choices 2026.
Frequently asked questions
Can I make vegan chocolate peanut butter bars ahead of time?
Yes, these bars are perfect for making ahead. Store them in an airtight container in the refrigerator for up to 5 days. They actually firm up even more when chilled, making them easier to cut and handle. For longer storage, you can freeze them for up to 2 months.
How do I know when vegan chocolate peanut butter bars are done?
The bars are done when the edges are set and slightly puffed, and the center looks moist but not wet. A toothpick inserted into the center should come out with moist crumbs attached, not liquid batter. Avoid overbaking, as they will continue to set as they cool.
What can I substitute for peanut butter in vegan bars?
For a different nutty flavor, you can substitute almond butter, cashew butter, or sunflower seed butter. Ensure the substitute is creamy and unsweetened for the best texture and flavor balance. If using a natural nut butter, stir it well before measuring to incorporate the oil.
How should I store leftover chocolate peanut butter bars?
Store leftover bars in an airtight container at room temperature for up to 2 days, or in the refrigerator for up to 5 days. Chilling them will make them firmer. For longer storage, wrap individual bars tightly and freeze for up to 2 months. Thaw at room temperature before serving.